Staff Sergeant Dennis Galpin’s glider landing during Operation Ladbroke was famously perfect. But where was it exactly? And is that his glider in the well-known photo?
There is a well-known IWM photograph of a Horsa glider taken in Sicily after Operation Ladbroke (see it on the IWM website). It has appeared repeatedly in histories because it was, until now, the only known picture of a Horsa from Operation Ladbroke. Nobody seemed sure exactly where it had been taken. Although it was suspected that it was Galpin’s glider, this was far from certain. The uncertainty was not helped by the IWM description, which states the glider landed “off course”, when in fact the exact opposite is true. Now new evidence in the form of a previously undiscovered film helps prove it. It is indeed Galpin’s glider.

In the newly discovered film, glider 133 (Galpin’s glider) is photographed from the other side, facing north-east towards the Ponte Grande bridge. The cameraman was apparently keen to show Allied tanks and vehicles streaming northwards along Highway 115 and crossing the bridge to Syracuse. The long south ramp of the bridge, which is still there today, can clearly be seen in the background.

Any doubts about the exact location of the landing are removed by an aerial photograph taken two days later on 12 July. It shows Galpin’s glider in the middle of LZ3 South, with its nose slewed into a ditch. The wheel tracks of its landing show that Galpin came in from almost due east, passing over the south ramp of the bridge as he did so. His flight path is exactly on a line from Maniace Castle in Syracuse across the bay, where there was a searchlight. There was also a searchlight at the nearby gun battery codenamed Gnat. In lighting up Galpin’s Horsa as he descended, one of these searchlights could not help but light up the bridge as well, guiding him in.
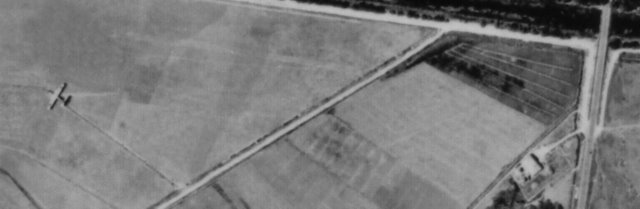
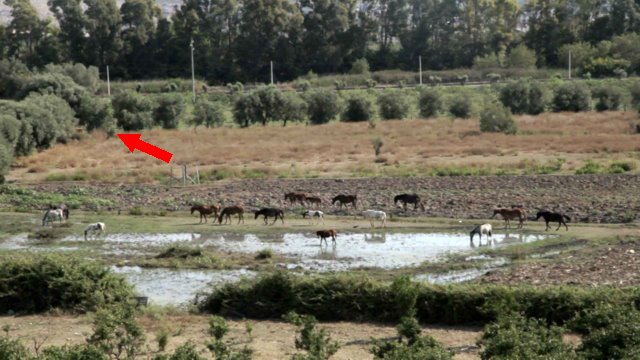
Although LZ3 South now has olive trees growing in it that were not there in 1943, its basic topography has not changed. The ditch that brought glider 133 to a sudden halt is still there. The exact landing spot is where that ditch now comes into a corner made by two lines of olive trees. Horses graze, and even in summer there is standing water in the low-lying meadows.
Clearly, claims that Galpin landed 50 yards from the bridge are wrong. The well-known contemporary magazine illustration by Bryan de Grineau (not available online) is also wrong, but can be forgiven in the name of dramatic licence. It shows the Horsa almost touching the ramp. There are many other departures from reality in it, even though de Grineau got his information directly from Lieutenant Colonel George Chatterton, the commander of the glider pilots in Sicily. But de Grineau’s painting is a brilliant piece of journalistic illustration just the same. Its purpose was not accuracy, but morale-building wartime propaganda and a celebration of British dash and daring.
The aerial photo shows that Galpin in fact landed nearly 500 yards from the bridge. Not that this in any way lessens his achievement. The immediate area either side of the south ramp had a convergence of electricity poles and cables (also still there today), shown on the map below, that were a hazard for a descending glider. Also on the map, the darker shaded triangle shows LZ3 South. The X-marks-the-spot shows that Galpin landed as near the centre of LZ3S as makes no difference.
The map also shows the route chosen by Lieutenant Lennard Withers to attack the bridge. He was commander of the platoon of 2 South Staffords in the glider. His initiative in attacking the bridge may have saved the day. But his approach to the bridge was sensibly circuitous, and relied on tackling the pillbox from the rear. Again, the facts belie the de Grineau illustration, which shows troops pouring out of the glider and straight onto the bridge in a frontal assault, firing from the hip as they went.
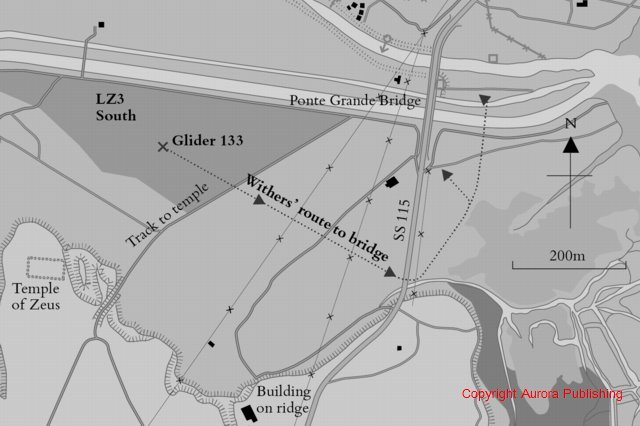
Some critics deprecate the choice of landing zones as being entirely inappropriate for gliders (LZ3S having, for example, glider-stopping ditches in it, like the one that stopped Galpin). The map and the photographs show that there wasn’t really anywhere else. To the south-east of the bridge were marshes and salt pans. The north side of the bridge was where all the pillboxes and barbed wire were sited. The land between the rivers was full of tall trees. To the south was a ridge fronted by cliff-like bluffs cut by gullies.
Some of these critics then say that paratroopers should have been used instead of glider troops. There are several reasons why they were not, not the least being that gliders were perfectly suited to coup-de-main work, as they allowed (when things went well) a silent approach, a precision landing and troops ready to deploy instantly as a single body.
Galpin’s glide showed what could be done. Despite the non-arrival of all the other Horsas headed for LZ3, Withers and his men seized the bridge and prevented its demolition. The spectacular pay-off could be seen exactly as the film cameraman arrived to photograph it: tanks and vehicles pouring across the Ponte Grande bridge into Syracuse.
Notes on the IWM Photograph
The new photograph of Galpin’s Horsa and the Ponte Grande bridge (above) comes from a 35mm film in the archives of the Imperial War Museum. The film is AYY 510/14. The image posted here is low resolution for the web. To reproduce it, apply to the IWM for a licence for commercial use, and for a list of film laboratories who can make high resolution copies and frame grabs.
You can watch the film here.
Notes on the painting “Galpin’s Glide”
The colour painting used on this page and in the banner for this website was specially commissioned from aviation artist Anthony Cowland. For more information, see [here].
